Showing posts with label freezer cooking. Show all posts

Tuesday, January 21, 2014

U is for UNDERSTANDING FREEZER COOKING--Determining the Type of Freezer Cook You Want to Become


Cooking day!


When a person asks me to help them get started in freezer cooking, I am always anxious to offer advice and help because I know how much it has helped me, blessed others, and nourished my family for the past twenty-three years. As I stated earlier on the blog, my first piece of advice is to not make it bigger than it needs to be. Freezer cooking doesn't have to be this all-encompassing way of life that is so huge you can't bear to face cooking day. On the other hand, if you like to go big (which I always have!), then by all means, go big.

The next piece of advice in starting to freezer cook is to determine what kind of freezer cook you want to be--that is, how extensive do you want to cook freezer entrees vs. just regular daily food preparation. By this, I mean that you can literally do something as simple as double a casserole one night each week to stockpile a few freezer entrees each month--or you can use the elaborate six month system that I used to use when my children were all at home. And then, of course, everything in between.

Here are some options for the "type" of freezer cook you might desire to be:

1. The aforementioned "extra casserole" each week cook. In this way, you eat like you normally have, cooking from scratch or using convenience foods each day, but one day a week, you make an entree for your family's meal and freeze a second one of the same type. In this way, you end up with a few freezer entrees each month to grab and use as you need to. It is also super simple to just double whatever you are making. It truly takes maybe 25% more time to make an additional one as opposed to making one to begin with. This might be a good choice for someone who doesn't want to do much but wants to dabble in freezer cooking and also wants to have some entrees on hand to bless others. (Blessing/helping others has been one of the biggest benefits of freezer cooking for me over the past two decades.)

2. The "ten pounds of meat" a week method. This is the method I am currently using, and I just love it. One day a week, my teenage son and another teen and I have a three hour Kitchen Session in which we do the following:
a. Ten pounds of some meat made into entrees (Today was taco meat; the last time it was braised beef cube mix for stroganoff and/or beef stew; before that it was spaghetti pies.)
b. Meal for that day (Today was sloppy joes and smashed red potatoes.)
c. Fill at least one crock pot insert for another meal over the next few days (usually soups and stews) (Today was chicken casserole in the crock.)
d. Clean/dice/prepare fruits and veggies
e. Make something special, like a cake for a carry in or bars for a dance or breakfast casseroles for a shower, etc. 

3. The "once a month cooking" method. My first introduction to freezer cooking was via the book Make a Mix Cookery. I began making mixes with this book twenty-three years ago (when I was pregnant with our fourth/middle child). I made "Bisquick," brownie mixes, cake mixes, cookie dough, white sauce balls for the freezer, quick bread mixes, and much more. This book introduced me to freezer cooking through freezer meats (like taco meat, braised beef cube mix, master hamburger mix etc.) that you can pull out of the freezer and use in other recipes. It was and still is an amazing book that set me on the path to home management that would make me successful at feeding nine of us for many years--and that helped me help others and train my own children in hard work and kitchen preparations. 


Following this book, after a year or two of doing freezer meats and mixes, I found the book that I used for several years--Once a Month Cooking. It was one of the first of its kind, and while I wouldn't want to use it today because my methods are much more efficient for us, it opened my eyes to the world of freezer cooking--and I embraced it whole heartedly, cooking for one day a month and putting up twenty entrees or so each time. In this book, you choose the recipes you want to make, the number of each, plan, shop, do preps, and then cook and freeze up to twenty entrees at one time--presumably for the next month.

When I first started using this method, I cooked two days one week (a day of preps then the next day cooking/freezing) and began using those meals immediately (about four per week). Then before those were gone, I did another cooking day and filled another freezer for the next month, etc. This book is a terrific resource for learning what freezes well and getting recipe ideas, as well as just getting an overview of freezer cooking in general.


Obviously, to do "once a month" cooking in a day (by yourself or with a partner or kids), you don't have to follow this book. After a while of using this book, I moved on to my own style of  "once a month cooking" in which I would do mostly one certain type of food (i.e. crumbled ground beef one month; shredded chicken the next). The problem with this is that if you are relying too much on your freezer meals, you end up eating the same type of meats that whole month. (See my solution below in my "six month cooking week.)


4. "Cycle cooking"--or "six month cooking week." 

The aforementioned "one type of meat per cooking day" led me to what I did for many years--a method that is not for the faint of heart! In this method, I divided my recipes into six "cycles":

a. Shaped beef and other beef (meatloaves, meatballs, tuna balls, salmon loaves, swiss steak, Florida steak, braised beef cube mix/stroganoff)
b. Crumbled beef (spaghetti pie, sloppy joes, lasagna, taco meat, taco pie, hamburger stew, chili soup starter, etc.)
c. Shredded chicken (chicken rice soup starter, bbq shredded chicken, chicken tetrazinni, chicken spaghetti, chicken lasagna, hot chicken sandwich filling, chicken rice casserole, chicken enchiladas, etc.)
d. Chicken breasts (parmesan chicken breasts, grilled/marinated chicken breasts, chicken parmesan, oven fried chicken, chicken fajita meat, Oriental chicken, chicken cordon bleu, Monterey chicken breasts, bbq chicken breasts)
e. Sides (potato casserole, rice casserole, fried rice starter, mashed potatoes, broccoli and rice, four bean bake, green bean casserole, cauliflower au gratin)
f. Desserts (cookie dough, unbaked cakes, pies, quick breads, etc.)

In the "six month cooking week," I started the process by shopping on Friday, preparing my bags and containers and labels on Saturday, and starting the cooking on Monday. I did about thirty entrees each day--one day shaped beef, one day crumbled beef, etc. I would fill one freezer with six months worth of freezer meals by the end of the week. It was exhausting (and at times overwhelming), but it was amazing to have that freezer full of meals.

Once that freezer was full, I just did regular freezer cooking one day a month--but I did a different cycle each time--and began filling up my other freezer. By the end of the six months, the first freezer full of meals was empty and the next one was full. It was my favorite system ever because it brought together the efficiency of freezer cooking with my super efficiency of cycle cooking--doing one type of meat at a time. (This system actually trained me to do the "ten pounds of meat a week" method I now use. Doing all of the same type of meat at one time is super efficient!)


5. "Power Hour" cooking

When I can't have my three hour "Kitchen Session" as described above, I often opt for the "power hour" freezer cooking. In this method, my son and I (or my husband at times) go into the kitchen for one hour and do as much as we can possibly do--of all the same things. In this regard, we might make six lasagnas or ten bags of sloppy joes or ten bags of taco meat or eight bags of chicken rice soup starter. This method only works if you do it often though--otherwise, you end up eating the same thing over and over!


So what kind of freezer cook do you want to be? What would best meet your family's needs? How do you cook--big or small? What feels right for you?

In starting out with freezer cooking, you can do whatever works for you! And you will bless your family and make your days run more smoothly in the process.


Sunday, January 5, 2014

Baking Rice


My grad-student daughter from Illinois, my fifteen year old son, and I spent half a day this week cooking with my daughter who is expecting her first baby (our first grandchild) in four weeks. I have done freezer cooking for twenty-two years, so the girls just naturally do these types of cooking and food preps as well.

In three hours, five of us did fifty meals! That is twice as many as I normally would do in that time with that many people working simply because I was splitting the meals between Cami and me--so we averaged four servings per meal (instead of the normal eight servings that my meals now make). She took the smaller ones (see picture above) while I took the bigger ones. So in essence, we did twenty-five entrees that fed three and twenty-five entrees that fed six to eight.

The details of how to freezer cook are definitely for another time (and I am looking into doing a podcast about it for those who have been asking a lot), but I did want to document the fact that I cooked rice in the oven for the first time, and it turned out wonderful!

One of the entrees we were making is called "meatball stroganoff over rice." We had long-grain brown rice, but my daughter forgot to bring her rice cooker, and mine is well, buried or lost or something. (I've been decluttering and getting rid of things and putting things I don't use as often in tubs, and, well, I lost the rice cooker.)

Normally, when I do freezer cooking (usually once a week I do four to ten entrees for the freezer during one of my twice-weekly (or thrice-weekly) Kitchen Sessions), I start things immediately that take a while. One of those early tasks would be to put a lot of rice in the rice cooker for this stroganoff dish. I couldn't put it in the microwave because that would tie up the micro too long, and I didn't want to cook it on the stove because it would also be tied up--plus, I hate watching rice on the stove top while I am freezer cooking. It is a pain and just another thing to think about when I am crazy busy in the kitchen.

I remember a friend telling me that another mutual friend cooks her rice in the oven, so I Googled it and discovered that it looked as simple as the rice cooker or micro method (both of which I love and yield perfect rice imho).

I will put the link below from about.com for detailed instructions, but I skimmed the recipe and did what I always do: did four times as much as the recipe said while not really doing what the instructions say--and hoped for the best!

In a nutshell, I put four cups of rice and eight cups of hot water in a jelly roll pan (huge "cookie sheet" type of pan with great sides--mine take up my entire oven, like the size of two 9x13's or so). I did this twice. Turned the oven on 375, covered the two pans tightly with foil, and forgot about the them for forty-five minutes or so. Then I pulled them out, removed the foil, and had perfect rice. It didn't take up my micro or stove top; I didn't have to stir or watch or add more water, etc. It was that simple.

Note that the instructions say that you need to boil the water first, add butter, etc., but I literally did what I wrote above. Easy peasy.  If I were doing it again, I would use broth. I always cook my rice in broth, but for some reason I forgot this time.

Anyway, we pulled the rice pans out of the oven and dipped the rice into the bottom of our foil pans, placed our meatballs all over the rice, then coated the meatballs with our stroganoff gravy. And they looked delicious!

Here is the official instructions from about.com:

http://culinaryarts.about.com/od/ricegrains/a/Rice-In-The-Oven.htm

Thursday, September 12, 2013

Beating Procrastination


No matter how many years of experience I have in getting things done and no matter how much I understand about procrastination and its effects on my life, I still occasionally do one really dumb thing: Put off doing something because I think it will be too hard or too long or too laborious or too messy or too boring or too something!

Then I finally do that undesired task only to find out that it was a thirty or sixty minute job--and the great feelings I have after I am done far outweigh the work itself!

I have, however, in the past few years learned some coping mechanisms for procrastination.

Here are a few tips to help you the next time you feel procrastination coming on:


1. Stop! 


Think about the situation for real. Ask yourself truly how long the task could honestly take. Answer yourself. And if it is under thirty minutes, JUST DO IT!


2. Break it down! 


We have taught this technique to our kids in study skills, chores, room cleaning, yard work, etc. Just take the big job and tell yourself that you will not try to do it all right now. Instead, tell yourself that you will simply do ten minutes a day three times a week until the task is done. You won't have to face the entire thing. Just set a timer (another thing we have taught our kids!) for ten minutes. When the ten minutes is up, marvel at how far you got on the project--and leave it until your next ten minute period.


3. Get someone's help. 


This summer I was sinking into a little depression after a family friend died. I was just so mournful for his wife (one of my best friends) and his children (my children's best friends) that I found myself unable to tackle very big jobs for a few weeks. After a couple of weeks of not getting much done, I realized that I had to do something to get myself in gear because classes would soon be starting and I would not have the time that I had in the summer. I decided to work on the things that I couldn't face at that time only when I had help. My fifteen year old son and his teenage friend became y assistant for a couple of hours once a week--and I saved the things that I just couldn't face by myself (things that I normally could have dug into without a problem) for when the three of us could work together. I finally got my freezers cleaned out, some garden produce put up, and my freezer meal preparations back on track. Sometimes it just takes a little help to get us moving in the right direction!


4. Make things you are constantly facing into weekly or daily tasks rather than saving them up until they feel formidable. 


An example of this for me is vegetable and fruit preparations. I used to save them all for one time each week--then I found it harder and harder to come up with the block of time needed to slice, dice, and julienne. Instead I made what was one big project into ongoing daily tasks.


5. For really difficult things, just dig in for a minute or two. 


I know that doesn't sound long enough to even get anything done. But a minute or two here and there starts to add up. Also, one minute soon becomes three or four minutes--and your momentum will start to build.

 I had like ten bags that were filled with various things--a document bag, gym bag, swimming bag, swimming toy/snack bag, old purse, new purse, lunch/snack bag, etc. And I stuffed them in the corner of the room, got two new bags at a garage sale (document bag and purse/go bag) and started using those two instead. Every time I looked at those dozen bags stuffed in the corner, I got a knot in my stomach. I just didn't want to face them.

 One day I told myself that I would just pull out the top bag and spend a minute or two on it. By the end of that ninety seconds, i had that bag cleaned out and put away! The next day I did another couple of minutes. My momentum was building and my bag pile was going down. Remember: You can do anything for one minute!


Entrees ready to go to the freezer!


I hope these don't sound trite or silly--like why in the world couldn't you just clean your freezer or sort your bags, lady! I think we all get overwhelmed at times with way too many things to do. And these tips help me during those times to JUST DO IT!

Saturday, September 7, 2013

Ten Freezer Foods I Don’t Like to Be Without

Ten Freezer Foods I Don’t Like to Be Without
           +Recipe link in Comments
                 *Must haves!


11.     Soup Starter+—the beginnings of chili, vegetable soup, chicken rice soup, potato soup, and more.

22.     Any kind of breaded chicken breasts*+ to pull out and use for main entrĂ©e, sandwiches, chicken parmesan, chicken cordon bleu (sort of!), chicken and gravy, etc.

33.     Sloppy joes+—One of my favorite sandwich fillings and so much healthier than cold meat sandwiches. I really like to have quart bags of these in the freezer.

44.     Master beef cube mix*+--I started with this twenty-three years ago and still use it today! I don’t think my freezer has been without bags of this for two decades! Used for homemade beef stew, stroganoff over noodles, homemade pot pies, and  more!

55.     Cheesy potato casseroles*+--I am sure my freezer hasn’t been without these in twenty years! I have had a number of recipes for this (some with sour cream, shredded cheeses, etc.), but for some reason, this has become my favorite, despite the fact that I hate cottage cheese! You absolutely can’t taste the cottage cheese, and that with the cream and Velveeta truly make the creamiest potato casserole! I take these to every potluck I go to it seems! (It’s actually a little too rich and a little too expensive to have for daily fare at home, so we usually only have this for special occasions (and potlucks, new mom meals, etc.), but I always keep some in the freezer for those times.)

66.     Shredded meats+—I like to put shredded chicken, beef, and pork in freezer bags with broth (or even gravy) to keep them moist. They are ready for anything—soups, stews, Mexican, Oriental, sandwiches, etc.

77.     Taco meat*—Talk about versatile—taco soup, Mexican pizzas, taco salad, tacos, nachos, hot Mexican dip, even chili in a pinch—this meat is my go to freezer meat!

88.     Lasagna*—Okay, I admit it. I actually tear up when I pull the last lasagna out of my freezer!! It is such a sad day! While taco meat and potato casseroles are musts in my freezer, nothing beats a meal-in-one-pan!

99.     Meatloaves—I have used Ray’s grandmother’s recipe (“Grandma’s Meatloaf”) for our entire married life. I love to pull out two meatloaves, bake them (with a sauce on top!), precook some little red potatoes in a fourth a cup or so of broth in the micro, and arrange the potatoes around the meatloaf the last thirty minutes or so in the oven. I also like to take meatloaves to new moms with cheesy potato casserole!

110.                         Marinated chicken breast pieces+--I have one recipe that we call “Don Pablo’s Chicken” because it is sweet and tastes similar to the fajita chicken at our favorite Mexican recipe. Anyway, I freeze this chicken both ways—in the marinade (marked RAW on the bag) and already stir fried (after marinating in the fridge for a while). I love having both kinds to pull out and use in Mexican and oriental dishes (fajitas; stir fries; and various skillets I make with veggies, rice, etc.)


LINKS for recipes from our blog:


My favorite way to cook meats for shredding is the crock pot in oven bags: http://raising-kids-with-character.blogspot.com/2013/05/crock-pot-wednesday-beef-and-pork.html

Friday, August 9, 2013

New Favorite "Hot Mexican Dip"---Has Sausage and Cream Cheese...Much Creamier Than Old Recipe!


1 large block of Velveeta
1 can Rotel tomatoes
1 block ceam cheese
1 can cream of mushroom soup
1 lb sausage (or hamburger or combination)
chili powder to taste

1. Fry meat and drain thoroughly. (Note: If you keep meat fried up in your freezer like I do, a pound is roughly 2 1/2 cups.)

2. Cube Velveeta and cream cheese.

3. Combine all except chili powder and heat in microwave, crock pot, or stove top. (If using micro or stove top, be sure to stir often as things start to heat up and melt.)

4. Add chili powder to taste.

Note: I use half sausage and half hamburger. I like the taste better than plain hamburger.

Wednesday, May 29, 2013

Power Hour: Introducing Our "Four to Six Freezer Foods in an Hour" Program


Watch our blog (and FB page) for our new summer series, "Power Hour," in which we will share recipes (with varying amounts and numbers of servings) that you can make in an hour (or less with some young helpers!) and make four to six (or more if making for three or four people) freezer entrees.

If you have always wanted to try freezer cooking, but an entire program of one whole day (or week!) of cooking feels overwhelming to you, our "Power Hour" might be just the thing to get you over the fear of freezer cooking!

Think your family won't like the foods? I have been freezer cooking for twenty-three years this summer, and while I have definitely evolved as a freezer cook, I have hundreds of recipes that my family loves--and not just layered or bagged casseroles either! Some of our favorites that I will be sharing with you include potato casserole, braised beef cube mix, meatloaves, meatballs, sausage rice stir fry, parmesan chicken breasts, poor man's steak, spaghetti pie, meats for stir fries and fajitas, and much more. And you can do each one in under an hour!

We'll post our first one the week of June 9th, so stay "posted"! :) And share with your friends!

Monday, May 27, 2013

FAST 5-MINUTE FAMILY FIXES---(Fajita) Chicken Crisps


Here is another potential five-minute-prep meal that my family loves! This is a good family night treat in lieu of getting take out pizzas.


Pre-cooked/pre-made chicken*

Shredded cheese of your choice

Flour tortillas

Garlic flavored non stick cooking spray (or melted butter with garlic)

Optionals: Onions and peppers (sometimes I have these pre-cooked and frozen with my meat; sometimes I don't use them at all)


*I usually use fajita chicken I have in my freezer from freezer cooking---but any already-made chicken will work in a pinch, such as store bought fajita chicken strips, rotisserie chicken chunks, or even canned chicken {drained}. You can also stick a couple of boneless breasts or thighs in a half a cup of broth and cook in micro until done and use that meat. Of course, you could make Beef Crisps with roast beef or hamburger crisps with taco flavored ground beef. 


Unbaked Fajita Chicken Crisps---These broil REALLY fast, so watch them closely!


1. Lay flour torts out on cookie sheet sprayed with cooking spray. Spray the tops of the torts and broil them under the broiler until tanned and somewhat crispy (twenty to sixty seconds---watch carefully!).

2. Remove torts from oven and sprinkle with chicken (and veggies, if desired) then shredded cheese.

3. Put pan back under broiler until cheese is bubbly (one minute or so--watch carefully!).

4. Cut in fourths and serve with sour cream, shredded lettuce, tomatoes, salsa, black olives, etc.

Note: This is a good way to use up leftovers--and can be made lower carb than many other Mexican dishes because it only uses one tortilla each and you can really top it with a lot of protein and veggies. Also, for lower cards, use the Carb Balance tortilla shells.

Monday, May 6, 2013

Freezer Entree Series Coming in June--Power Hour

Braised Beef Cube Mix

Did you know that some freezer entrees can be assembled as you are putting away groceries or flipping some pancakes for Saturday brunch? Did you know that you can quite possibly put four or six entrees in the freezer in under an hour with just a litte preplanning and organization? And that you can become a freezer cook without carving out three or four days of shopping, precooking, cooking, bagging, labeling, and freezing?

I have been an avid freezer cook for twenty-three years next month! I started out small with the Make a Mix Cookery cookbook (which has a few freezer entrees and "starters") and within a few years it wasn't uncommon for me to have fifty to two hundred freezer entrees, side dishes, soup starters, and more in my freezers at any given time.

I homeschooled six children at one time during one point in our parenting (seven children total), so my days of school and discipling and disciplining were long. While we taught our children to work hard, and they did all have kitchen duties every day, including breakfast prepaations, lunch duty, and assistant chef to Mom in the evenings (and eventually full responsibility for an evening meal each week), it was still a lot to think about/pull off daily cooking of that much food for that many people for all three meals. My freezer cooking made this aspect of my life so much easier.

However, like many freezer cooks you might know, it was quite a production during cooking week. It usually took at least three days to really shop, cook, and freeze meals and side dishes. It was exhausting but so worth it.

Fast forward now when I am at a point in my life in which I only homeschool one child and I work full time hours on writing, editing, teaching (testing my books), blogging, speaking, etc. My schedule isn't flexible enough right now to take off for three or four days to do freezer cooking any more. Yet I still have a houseful of adults (four kids ages fourteen through twenty-two and two parents) to feed!

Enter the freezer cooking method I have been utilizing more and more in the past few years--that of coooking multiple batches of one recipe at one time and using one of them for that day's meal and freezing three, four, or five others for later. It takes very little prep time, small amounts of planning, and I have entrees in the freezer in a flash.

Join me this summer as I share recipes, along with the measurements/scaling needed to do Power Hour freezer cooking for your family--and end up with a freezer full of entrees this fall with only an hour of work once or twice a week. I will share our old favorites, the recipes I began freezer cooking with twenty-three years ago (like the Braised Beef Cube mix in the picture above and Grandma's Meatloaf), as well as newer ones (like beef enchiladas and marinated meats for stir fries). I'll throw in some desserts and side dishes here and there. And without setting aside an entire week or taking a lengthy class, you, too, can become a freezer cook. And you will absolutely love the convenience and ease of having freezer entrees.

Hope you will join us! You might want to subscribe to this feed via email (in addition to FB) to ensure that you don't miss any. Watch for the header Power Hour Freezer Cooking!

Wednesday, April 3, 2013

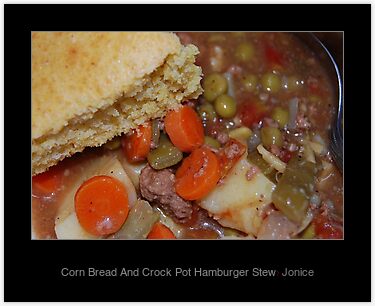
Crock Pot Wednesday: Hamburger Stew (Another great freezer entree to start with!)


On Wednesdays, I like to have something in the crock pot for lunch. We have cottage classes here, teaching over fifty homeschooled students once-a-week classes, such as writing, English, biology, economics, and more. It is tons of fun--but a super busy day, so I put a stew or soup together in the crock pot that my co-teachers (first two sons, Joshua {30} and Jonathan {20}) and Jakie (our only homeschooled student now :(   ) can eat whenever they get a break.

This week's crock pot entree is Hamburger Stew. I originally got this recipe over twenty years ago when I began freezer cooking. It fit the bill perfectly then when hamburger and shredded-off-the-bone chicken were our main meats--and almost always used IN recipes to stretch them further (as opposed to chicken pieces or hamburger patties).

 It can be assembled then frozen before cooking (though the ingredients are all precooked). Then I can get it out of the freezer, defrost it, and either put it in the crock pot or oven. I no longer make it as a freezer entree because I have found that if I have precooked hamburger in the freezer, this stew comes together so quickly that I don't need to even take up freezer space freezing it already assembled. However, if you are new to freezer cooking and looking for some satisfying, one dish entrees to start with (that are simple), this is definitely one to begin with.

Note: It is a tomato-based stew as opposed to many beef stew recipes that are gravy-based. It does have a lot of beefy flavor (not tomato-y like a red sauce or something), but the tomato sauce makes it a completely different stew than our beef stew recipe. Also, I use small vegetables in this. I like smaller veggies with the hamburger but larger, chunkier veggies with stew beef. Just be sure if you use some larger and some smaller that they are fully cooked before assembling; otherwise, the vegetables will get done cooking at different times.


Hamburger Stew

5 to 6 lbs. raw ground turkey or hambuger (16 to 18 cups cooked and drained)
3 cans tomato sauce (15 oz)
3 cans mushroom soup or golden mushroom soup (You may make your own or make a beef gravy for this.)
7 cups beef broth
1 ½ cups milk (or cream or half and half)
6 cups cubed hashbrowns (or 3 cans potatoes)
6 lbs frozen mixed vegetables
6 TBSP minced onions
1/2 to 1 tsp garlic powder (I use a garlic-herb mixture and put more than this calls for)
6 bay leaves
Extra beef base or powdered brown gravy mix, if desired

  1. Precook any fresh veggies that you substituted for the frozen (i.e. carrots, green beans, potatoes, etc.)---only if using substitutions.
  2. Brown meat and drain.
  3. Mix all other ingredients together. (If mixture seems especially tomato-y or thin, I will stir in a little brown gravy mix.)
  4. Place heaping amounts of stew in 3 (9 x 13) foil pans (deep ones or two shallow ones; or one gallon freezer bags if planning to cook on the stove top or in the crock pot).
  5. Freeze and label:
Hamburger Stew              Serves 10-12+
Thaw. Bake covered at 350’ for 45 – 60 minutes.
  1. May also place in freezer bags and label, then place in casserole dishes at baking time (or cook in crock pot).
  2. May also simmer on stove top for under an hour on medium, stirring frequently.
+Each recipe (this makes it three times) serves ten to twelve people.


Note: This recipe can be made more homemade (make own soup, use real potatoes that you cube and precook), etc. or less homemade (use all canned products), according to your time schedule and family's eating. 


Monday, March 25, 2013

Spaghetti Pie ("Busy Mama's Lasagna")

"Pie" before freezing or baking
The five pans of "spaghetti  pie" before I added the meat sauce on top


Spaghetti Pie ("Busy Mama's Lasagna")

I made this recipe five times to make five deep 9 x13 casseroles---one for today and four for the freezer! :) Each deep casserole serves eight to ten people well.


10 oz spaghetti
4 eggs
2 TBSP butter
3/4 cup Parmesan cheese
12 oz of cottage cheese, sour cream, or ricotta cheese (I have never used anything but cottage cheese)
4 cups favorite spaghetti sauce ("marinara")
1 1/2  cup shredded Mozzarella cheese (plus 1/2 cup more for top)
Up to 1/4 cup milk
1 1/2 lb meat (I use ground beef, but I have seen recipes that call for crumbled sausage--and smoked sausage would also work in a pinch and reduce your prep time)

1. Break spaghetti in thirds and cook until al dente in boiling water. (I used 48 oz of spaghetti so used my huge stock pot...as in REALLY big...).

2. Cook ground beef and drain it.

3. Drain spaghetti. While warm, add butter, eggs, and Parmesan cheese to the pasta and toss.

4. Place into a well greased casserole. (At this point, many recipes say to "make a well" for the cottage cheese mixture; I just layer it right over all of the pasta, more like a lasagna.)

5. Mix cottage cheese, mozzarella cheese, and a little milk (as needed for "spreadability").

6. Spread cottage cheese mixture over pasta base.

7. Combine meat and red sauce. Pour over cottage cheese layer.

8.  Bake at 350 degrees for 40 minutes uncovered.

9. If desired, sprinkle another 1/2 cup of mozzarella over dish during last ten minutes.

This recipe was in my "ground beef cycle" from my many years of MEGA freezer cooking. It freezes great and makes a nice all-in-one-dish entree for a new baby's arrival or for feeding many people a hearty entree (when using two or three of them).


 Five foil pans of Spaghetti Pie ready for the freezer!
Add caption


Wednesday, January 9, 2013

Crock Pot Wednesday--Hamburger Stew


On Wednesdays, I like to have something in the crock pot for lunch. We have cottage classes here, teaching over fifty homeschooled students once-a-week classes, such as writing, English, biology, economics, and more. It is tons of fun--but a super busy day, so I put a stew or soup together in the crock pot that my co-teachers (first two sons, Joshua {30} and Jonathan {20}) and Jakie (our only homeschooled student now :(   ) can eat whenever they get a break.

This week's crock pot entree is Hamburger Stew. I originally got this recipe over twenty years ago when I began freezer cooking. It fit the bill perfectly then when hamburger and shredded-off-the-bone chicken were our main meats--and almost always used IN recipes to stretch them further (as opposed to chicken pieces or hamburger patties).

 It can be assembled then frozen before cooking (though the ingredients are all precooked). Then I can get it out of the freezer, defrost it, and either put it in the crock pot or oven. I no longer make it as a freezer entree because I have found that if I have precooked hamburger in the freezer, this stew comes together so quickly that I don't need to even take up freezer space freezing it already assembled. However, if you are new to freezer cooking and looking for some satisfying, one dish entrees to start with (that are simple), this is definitely one to begin with.

Note: It is a tomato-based stew as opposed to many beef stew recipes that are gravy-based. It does have a lot of beefy flavor (not tomato-y like a red sauce or something), but the tomato sauce makes it a completely different stew than our beef stew recipe. Also, I use small vegetables in this (not like the picture that has some chunky veggies). I like smaller veggies with the hamburger but larger, chunkier veggies with stew beef. Just be sure if you use some larger and some smaller that they are fully cooked before assembling; otherwise, the vegetables will get done cooking at different times.


Hamburger Stew

5 to 6 lbs. raw ground turkey or hambuger (16 to 18 cups cooked and drained)
6 cans tomato sauce (15 oz)
3 cans mushroom soup or golden mushroom soup (You may make your own or make a beef gravy for this.)
5 ½ cups beef broth
1 ½ cups milk (or cream or half and half)
6 cups cubed hashbrowns (or 3 cans potatoes)
6 lbs frozen mixed vegetables
6 TBSP minced onions
1/2 to 1 tsp garlic powder (I use a garlic-herb mixture and put more than this calls for)
6 bay leaves
Extra beef base or powdered brown gravy mix, if desired

  1. Precook any fresh veggies that you substituted for the frozen (i.e. carrots, green beans, potatoes, etc.)---only if using substitutions.
  2. Brown meat and drain.
  3. Mix all other ingredients together. (If mixture seems especially tomato-y or thin, I will stir in a little brown gravy mix.)
  4. Place heaping amounts of stew in 3 (9 x 13) foil pans (deep ones or two shallow ones; or one gallon freezer bags if planning to cook on the stove top or in the crock pot).
  5. Freeze and label:
Hamburger Stew              Serves 10-12+
Thaw. Bake covered at 350’ for 45 – 60 minutes.
  1. May also place in freezer bags and label, then place in casserole dishes at baking time (or cook in crock pot).
  2. May also simmer on stove top for under an hour on medium, stirring frequently.
+Each recipe (this makes it three times) serves ten to twelve people.